4. Material and location clusters
In this chapter, we will configure the material and location clusters described in the forecast configuration foundations using material and location characteristics. Clusters represent material or location subsets and can be configured using:
- product categories and families for material clusters;
- regions and channels for location clusters.
We will use the characteristics loaded in chapter 2.
At the end of this stage, there will be two material clusters representing the two existing product families.
For didactic simplicity, this tutorial does not segment locations. Because no location cluster will be created, the Default Location Cluster — a non-configurable default fallback cluster that receives every location not assigned to another cluster — will receive all 12 active locations.
This produces two distinct demand-forecast model configurations:
- Material cluster Produtos acabados de papel branco / location cluster Default Location Cluster;
- Material cluster Produtos acabados de papel tissue / location cluster Default Location Cluster.
Exercise starting point
Use the result from chapter 2 as the starting checkpoint:
- 18 materials and 54 material-characteristic assignments are loaded;
- 12 locations and 12 populated location-characteristic values are loaded;
- Sales history contains 2,280 rows;
Cluster design
| Cluster type | Description | Rules | Expected members |
|---|---|---|---|
| Material | Produtos acabados de papel branco | ESTAGIO_MATERIAL = Produto acabado and FAMILIA_PRODUTO = Papel branco |
8 products (finished goods) |
| Material | Produtos acabados de papel tissue | ESTAGIO_MATERIAL = Produto acabado and FAMILIA_PRODUTO = Papel tissue |
2 products (finished goods) |
| Material | Default Material DP Cluster | Platform default cluster: fallback for materials not assigned by a specific cluster | 8 materials (semi-finished goods and raw materials). They will not receive a demand forecast because they have no sales history. |
| Location | Default Location Cluster | Platform default cluster: fallback for locations not assigned by a specific cluster | 12 locations |
These clusters produce only the two effective combinations configured in the tutorial:
---
config:
  layout: elk
---
flowchart TB

  subgraph R1[" "]
    direction LR

    subgraph SG1["Combination 1"]
      direction LR

      L1["Default Location Cluster<br/><span style='font-size:10px;color:#64748b'>12 locations</span>"]
      M1["Produtos acabados de papel branco<br/><span style='font-size:10px;color:#64748b'>8 materials</span>"]
      C1["Forecast Configuration<br/>Papel branco × Default Locations"]

      L1 --> C1
      M1 --> C1
    end

    F1["Cluster-level<br/>forecast — Papel branco"]
    SG1 --> F1
  end

  subgraph R2[" "]
    direction LR

    subgraph SG2["Combination 2"]
      direction LR

      L2["Default Location Cluster<br/><span style='font-size:10px;color:#64748b'>12 locations</span>"]
      M2["Produtos acabados de papel tissue<br/><span style='font-size:10px;color:#64748b'>2 materials</span>"]
      C2["Forecast Configuration<br/>Tissue × Default Locations"]

      L2 --> C2
      M2 --> C2
    end

    F2["Cluster-level<br/>forecast — Tissue"]
    SG2 --> F2
  end

  R1 ~~~ R2
  style R1 fill:none,stroke:none
  style R2 fill:none,stroke:none
Open the workspace
1. In the sidebar, select the Configuration icon.
2. In Core Configuration, select Clustering.
- Open the Dimension dropdown and choose Material clusters.
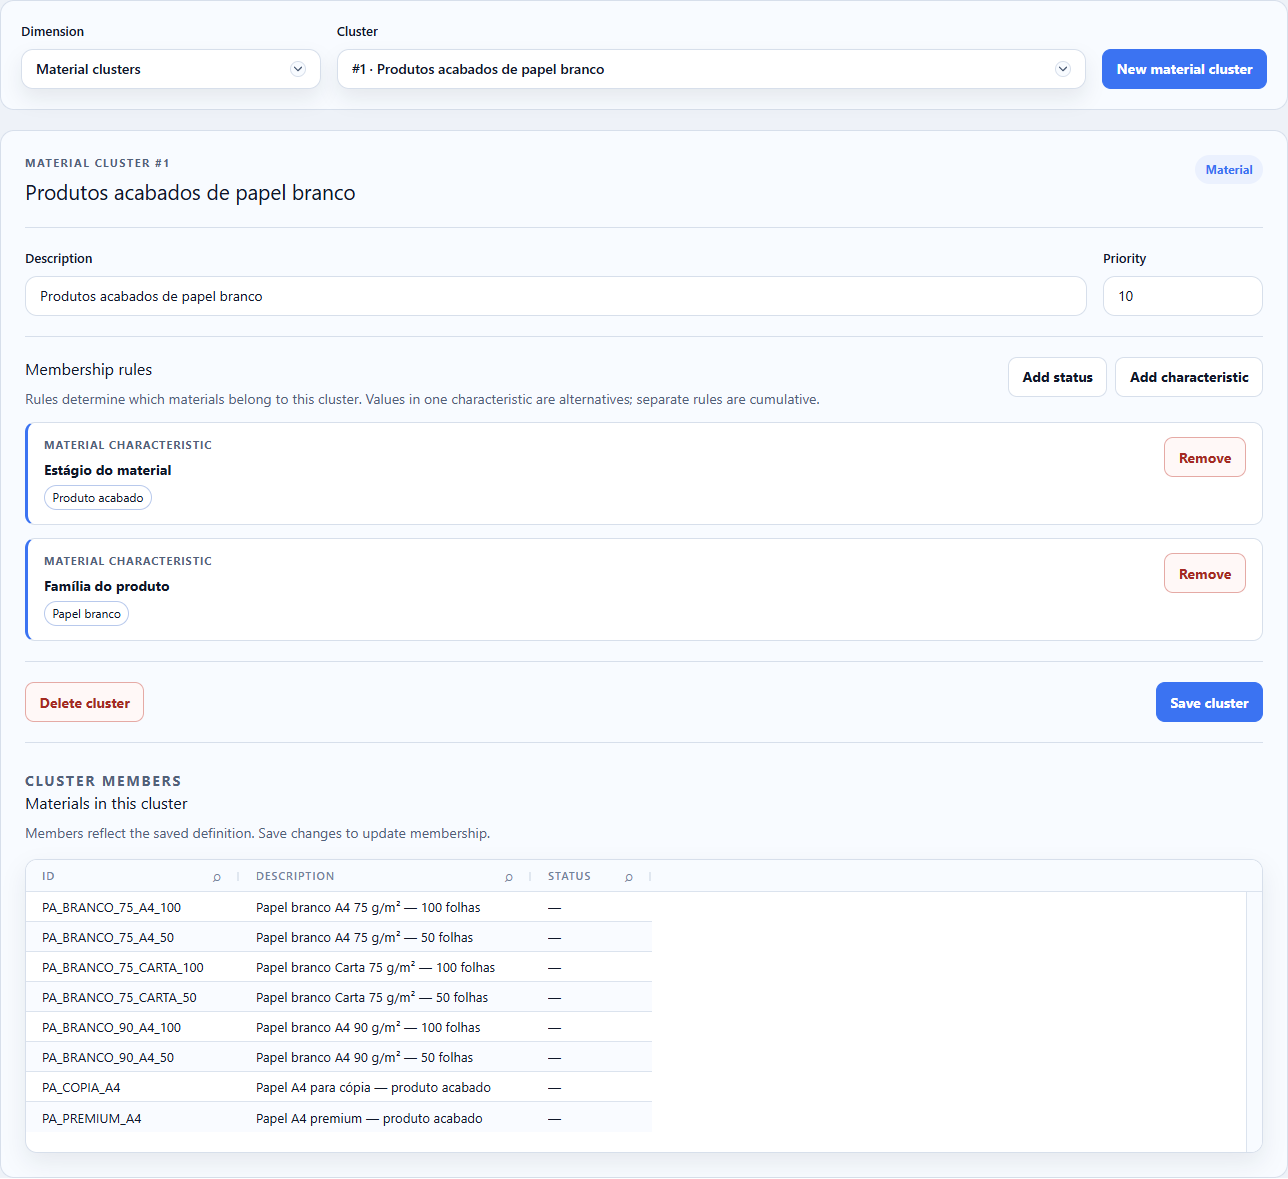
This capture uses the local Community interface revision prepared with this tutorial, connected to the actual scenario. The selection area shows dimension and cluster separately; the editor places the rules above the member list. This visual revision still needs to accompany the front-end distribution.
Create the white-paper cluster
- With Dimension = Material clusters, choose New material cluster.
- Enter
Produtos acabados de papel brancounder Description. - Enter priority
10. -
Choose Add characteristic.
-
Keep Criterion = Material characteristic, select Estágio do material under Characteristic, then Produto acabado under Values.
- Choose Add characteristic again.
- Select Família do produto under Characteristic, then Papel branco under Values.
- Check the description, priority, and both rules.
Cluster allocation rules
Rules inside one cluster are cumulative. A material enters the cluster only
when it is both a Produto acabado and belongs to the selected family.
- Choose Save cluster. The platform saves the rules, closes the New material cluster editor, and shows the save confirmation. The page returns with no cluster selected.
- Under Cluster, select Produtos acabados de papel branco.
- The page now shows Material cluster #ID, the saved rules in summary mode, and the new Cluster Members section below the actions. Materials in this cluster then loads automatically. Check the eight white-paper finished goods; rolls and skids must not appear.
Create the tissue cluster
Required action
Repeat the previous cluster logic for tissue, changing only description, priority, and product family.
- Still under Material clusters, choose New material cluster.
- Enter
Produtos acabados de papel tissueand priority20. - Add
Estágio do material = Produto acabado. - Add
Família do produto = Papel tissue. - Save the cluster.
- Under Cluster, select Produtos acabados de papel tissue again.
- Wait for Materials in this cluster to update automatically, then check
the two members:
PA_SANITARIO_DUPLO_12andPA_SANITARIO_TRIPLO_12.
The Cluster members panel is resolved from the saved definition. It proves that the rules selected the expected materials, not merely that the form was filled in.
Read the result
The reconciled tutorial state is specific: Produtos acabados de papel branco has 8 products, Produtos acabados de papel tissue has 2, and the other 8 materials remain in Default Material DP Cluster. Because the tutorial creates no specific location cluster, 100% of its 12 locations remain in Default Location Cluster.
Checkpoint
- 2 functional material clusters with 8 and 2 members;
- the other 8 materials allocated to Default Material DP Cluster;
- no statistical configuration or Demand Plan created;
- rules and members reloaded from the server, not only displayed in a draft.
The next lesson creates a monthly Demand Planning execution profile. Holt-Winters configuration for both combinations follows in the next chapter. Return to the course map or continue to the demand execution profile.